Showing posts with label Baking/Cooking. Show all posts

Friday, June 28, 2013

#72 DZPII: Bake & decorate a two tiered cake

For my good friend Shanna's little girl Abigal's 3rd birthday, her theme was "Watermelons!"
 
So I offered to make her birthday cake and it was definately a watermelon - pink cake with watermelon flavoring (complete with mini chocolate chips in the cake to look like "seeds") and the two-toned green watermelon rind!
 
 
I don't have a picture of it cut opened, but trust that it's very pink and very watermelon!

Monday, February 4, 2013

#74 DZPII: Take Cake Decorating Classes

#74 DZPII: Take Cake Decorating Classes
 
So for Christmas my Mom got us night classes at a nearby bakery for cake decorating classes - beginners classes! I was beyond excited because I've really wanted to go to the Micheals/Wilton classes, but the times were never good for my schedule.
 
But for four weeks, every Monday night, Mom and I would head over at 7pm and play with piping bags, star tips, buttercream icings, and of course... cake! It was a blast! So much fun - and my coworkers loved my creations I'd bring in the next day for them to eat!


Our (dummy) cakes the first class: learning about the different kinds of piping tips and how to ice the cake. The very beginning to cake decorating....
 
On the second class we had to bring two 8" round cakes in the pans, and icing for them, in whatever colors we wanted. Mom wanted to work on her buttercream roses, but it was unfortunatly too warm, so a couple of them drooped... I waited till the end to do my roses, but ran out of time: took so long on my scalloped border around the cake! So no roses on that cake!
 
 
The third was learning how to create a cupcake bouquet! These are fun and fast! Just takes 19 cupcakes to make a flower bouquet or a special scene for your celebration! I worked on a Cars themed bouquet (for Ryan's 2nd birthday coming up), and Mom worked on flowers!


The last class was on character cakes. I've had my Hello Kitty cake pan for several years, and never baked from it because I didn't know how to decorate her! And Mom was inspired by Ryan's 2nd birthday theme: Cars!

#64 DZPII: Make Homemade Pretzels

#64 DZPII: Make Homemade Pretzels
 
My first job out of high school was at the mall... so needless to say I love me some mall food. And good old Auntie Anne's is always there and a pretzel was waiting for me... with a side of cheese sauce! I've missed Anne's since I left the mall, but everytime I felt the need to "physically shop" (instead of my prowlings on the internet) I head to the mall... and the pretzels are still there.
 
 
But I've always thought I'd venture out of the comfort-zone of cupcakes and cookies, and bake something else... something bread-like... something like PRETZELS!
 
 
Recipe adapted from Daily Savings
 
Ingredients:
-1 teaspoon sugar
-1 package (2 1/4 tsp.) active dry yeast
-1/2 teaspoon salt
-1 1/2 cups whole-wheat flour
-3/4 cup all-purpose flour
-1/4 cup baking soda
-1/4 cup coarse salt

Directions:
1. Stir 1 cup warm water (105°F to 110°F), yeast, sugar and salt in an electric mixer fitted with a dough hook. Set aside until yeast has dissolved and mixture bubbles, about 5 minutes. Stir in both flours, set mixer speed to medium and knead with dough hook until dough is smooth and elastic, about 10 minutes. (Or, mix with a wooden spoon and knead by hand.) Transfer dough to an oiled bowl, cover with a clean kitchen towel and set aside in a warm, draft-free spot until doubled in size, about 1 hour.

2. Preheat oven to 425°F. Oil 2 large baking sheets. Stir baking soda and 2 cups warm water in a bowl until dissolved.

3. Turn dough out onto a floured work surface; cut into 20 equal-size balls. Working with 1 at a time, roll and stretch each ball to form thin, 12- to 15-inch-long ropes. Twist each into a pretzel shape.

4. Use a slotted spoon to dip each pretzel into baking soda solution; place on a baking sheet. Reshape as needed. Sprinkle with coarse salt. Bake until browned, about 10 minutes. Remove sheets to a wire rack to cool for 10 minutes; transfer pretzels to rack to cool further.

Monday, January 28, 2013

Noah's Elephant Cake

Noah's 1st Birthday Elephant Cake!
 
 
So during my cake classes, I've been a maniac posting my cakes/cupcakes on all the social medias. I even posted a status update asking if anyone wanted a cake because I wanted more practice... and couldn't keep taking them to work hahaha.... So an old high school friend contacted me and asked if I wanted to do a cake for her son's first birthday! (simply for practice of course *wink*) So I accepted and took off on Wilton.com to look for ideas. 
 
Noah's theme was 'Elegant Elephants' so I found this elephant cake which used the teddy-bear pan. I've never done a "character" cake before, but what a great time to try! I read up on the "how-to" and I figured I could do it! 
 
Because I needed roll-out/sugar cookies for the ears and trunk of the elephant, I also cut out his name and used the color flow technique, which I also never done, but really wanted to do!
 
It was a lot of fun and good practice putting the cake together and it was even better that I got to catch up with an old friend and her little one!


Thursday, December 20, 2012

#26 DZP: Cook a Prime Rib Roast

#26 DZP: Cook a Prime Rib Roast
 
Now this was originally the Mr's recipe he wanted to do. So he did buy the roast and he butchered it, but he had to work late and I really didn't want this roast to go to waste. So he helped me (more like coached me) and I cooked it!
 
Using Iron Chef Michael Symon's recipe we read in our Food Network magazine, I was able to cook it and it was great! The house smelled amazing and not going to lie: I was super pleased with myself!
 
 
Prime Rib
Recipe Adapted from Michael Symon from Food Network
(Note: Total time is 4 hours, not including overnight refrigeration)
 
Ingredients:
  • 1 4-bone prime rib, bones and excess fat removed and reserved
  • 4 teaspoons kosher salt
  • Freshly ground black pepper
  • 4 sprigs fresh rosemary
  • 4 cloves garlic, unpeeled, smashed
  • 4 ounces arugula (optional)
  • 2 teaspoons extra-virgin olive oil (optional)
Directions:
  1. Liberally season the prime rib with the salt and some pepper and refrigerate overnight.
  2. An hour before cooking, remove the roast from the refrigerator to allow it to come to room temperature.
  3. Meanwhile, preheat the oven to 400 degrees F.
  4. Put the reserved ribs in a roasting pan bowed-side up (the ribs will be acting as the roasting rack). Scatter any fat and meat trimmings in the pan around the bones. Roast the bones and trimmings for about 30 minutes, or until the fat starts to render.
  5. Remove the pan from the oven, put the rosemary sprigs on top of the bones, then top with the prime rib. Put the smashed garlic in the bottom of the pan with the trimmings. Baste the beef with the fat drippings and return the pan to the oven.
  6. Cook for 30 minutes and then baste the roast again.
  7. Reduce the heat to 350 degrees F and cook until the meat is medium rare (an internal temperature of 125 degrees F to 130 degrees F), about 1 hour, 15 minutes, basting the roast every 30 minutes until it is done. Keep in mind that the roast will continue to cook while resting.
  8. Remove the roast from the oven and put it on a cutting board to rest, uncovered, for 20 minutes. Slice the prime rib to the desired thickness and garnish with the arugula and olive oil.

Wednesday, December 19, 2012

#5 DZP: Transform a recipe to your own - Lemon Gooey Butter Cookies

Who doesn't love a soft, melt-in-your-mouth cookie? Really, who doesn't?!

Last week I found a Paula Deen recipe called Chocolate Gooey Butter Cookies. It was an awesome cookie all around. Easy to bake and definitely easy to eat. Because of the ingredients, it's like eating cake, but so very much a cookie.

So why not try LEMON! Oh Ya!

Note: the picture is not my proudest one, but they flew out the door like hot cakes, so I had to stop a coworker so I can at least take a snap shot!


Lemon Gooey Butter Cookies
Recipe Slighty Adapted from Paula Deen

Ingredients:

  • ½ cups Butter (1 Stick), Softened/Room Temp
  • 8 ounces, weight Cream Cheese, Softened/Room Temp
  • 1 whole Large Egg
  • 1 teaspoon Lemon Extract (or Juice from 1 Large Lemon)
  • 1 whole Large Lemon, Zest Grated
  • 1 package (18.25 Oz. Size) Lemonade Flavor Cake Mix
  • Granulated Sugar, For Rolling
  • Confectioners Sugar, For Dusting


  • Directions:


    1. Mix the cream cheese and butter until mixture is smooth. Beat in the egg, lemon extract/juice and lemon zest until combined. Add the cake mix and beat just until mixed.
    2. The dough is too sticky to roll into balls, so cover the bowl and refrigerate the dough for 1-2 hours.
    3. Preheat the oven to 350 F.While that's warming up, take out covered bowl from refrigerator.
    4. Place some granulated sugar into a separate bowl or plate. Scoop out dough into 1-inch to 1 1/4-inch balls. Drop each dough ball into a plate of granulated sugar and roll it in the sugar to coat completely.  
    5. Place the dough balls 2″ apart on ungreased/parchment paper covered cookie sheets; flatten slightly. Bake at 350 F for 12 minutes. DO NOT overbake. Take the cookies out of the oven when they look a little underdone.
    6. Let the cookies cool on the pan for 1-2 minutes, then remove them from the pans to wire racks and cool completely.  
    7. *Optional* Dust with confectioners sugar
    Store the cookies in an airtight container. Makes about 2 1/2-3 dozen.

    Friday, December 14, 2012

    #22 DZP: Eat my first Macaron!

     
    #22 DZP: Eat my first French Macaron!

    It was my Mom's birthday on December 5th. But she was on "expedition adventure" down at Antarctica. But we waited for her return to carry on our tradition of enjoy birthday dinner at the Melting Pot, just us two! (since 2008!)

    Just before we went in, I remembered a small, adorable bakery that's just a little walk from the restaurant. We had time so we popped in to see what Merely Sweets had.


    I knew they had macarons and cupcakes, but I wasn't expecting the number of flavors! Needless to say, my Mother and I took a dozen and I believe we got every flavor:


    They're light, sweet, and really delicious! I'll have to control myself because I could eat them all right now. I split them with my Mom: birthday treat for her & goal complete for me! YAY!

    I will spare everyone a picture of me eating (& throughly enjoying) a macaron. No need for that!

    Now I don't know if you've seen the Macaron Trees online or through Pinterest, but they look amazing. And at Merely's they have a tree guide for their customers:

     
    Shout out to Merely Sweets! They were BOMB!

    Wednesday, November 28, 2012

    Banana Cream Pie Cupcakes

    Banana Cream Pie Cupcakes


    Again while searching through the lovely Pinterest, I came across these bad-boys: Banana Cream Pie CUPCAKES! Yes I said it! Cupcakes! And over at the Betty Crocker site, Arlene Cummings with Cooking with Sugar posted this recipe and I had to try it!

    Recipe adapted from Arlene Cummings

    Ingredients:

    For Cupcakes -  
    1 Box of Betty Crocker® FUN da-Middles™ yellow cupcake mix with creamy vanilla filling
    3/4 cup water
    1/3 cup vegetable oil
    2 eggs
    1/2 box (3.4-oz size) banana cream instant pudding and pie filling mix
    12 vanilla wafer cookies

    For Frosting -  
    1 cup butter, softened
    4 cups powdered sugar
    1/2 box (3.4-oz size) banana cream instant pudding and pie filling mix
    3 tablespoons whipping cream
    1 tablespoon vanilla
    2 teaspoons banana extract
    For Garnish -  
    1/4 cup graham cracker crumbs (I forgot to do this haha)
    12 vanilla wafer cookies

    Directions:

    1. Make cupcake batter as directed on cupcake mix box, using water, oil, eggs and adding 1/2 box of pudding mix. (Other half of box will be used in frosting.)

    2. Before filling paper baking cups as directed on box, place 1 vanilla wafer cookie in bottom of each paper cup. Fill cups as directed on box. Bake and cool cupcakes.

    3. Meanwhile, in medium bowl, beat frosting ingredients with electric mixer on medium speed until smooth. Refrigerate until ready to use.

    4. Frost cooled cupcakes. Sprinkle tops with graham cracker crumbs; top each with 1 cookie.

    For the "how-to" click here, it really helped me!


    Friday, November 2, 2012

    PB&J Sandwich Cake!

    Peanut Butter & Jelly Sandwich Cake
     

    You better believe it!

    My boyfriend came across this from our Food Network magazine and he said "you HAVE to do this!", so I made it for a BBQ party!

    Now the first time I made it, it didn't come out great... I didn't bake the cake long enough, only 25 minutes. So I had to scrap it in the trash and start all over again. Thankfully I had an extra cake mix box and all the ingredients needed for it!

    Recipe adapted from Food Network Magazine

    Ingredients:
    PAM Baking spray
    1 18.25 oz box white cake mix (plus the required ingredients)
    1 cup creamy peanut butter
    1 1/2 to 2 cups of confectioners' sugar
    2 to 3 tablespoons milk
    1 to 1 1/2 cup strawberry jelly (but you can use whatever jelly you like)

    Direction:
    1. Spray a 9-inch square pan with PAM Baking spray and set aside. Make the cake mix and fill the pan three-quarters full (you might have batter left over). Bake at 350 degrees F until a toothpick comes out clean, 30 to 35 minutes (it took the full 35 minutes for my oven).

    2. Let the cake cool in the pan 10 minutes, then turn out onto a rack and let cool completely. Transfer the cake to a work surface. Trim off the top using a serrated knife, then slice the cake in half horizontally.

    3. Beat the butter and peanut butter with a mixer until smooth. Alternate adding the confectioners' sugar and milk, beating after each addition, until the frosting is fluffy and smooth. In another bowl, whisk the grape jelly until it is loose and spreadable.

    4. Spread a thick layer of peanut butter frosting on the bottom cake half.

    5. Spread the jelly on top of the peanut butter frosting, making sure to reach the edges. Top with the remaining cake layer.


    For a helpful how-to (incase you didn't get that issue of the magazine) click here!
     
    I love PB&J sandwiches and now it's a great dessert! Thanks Food Network!

    Friday, October 26, 2012

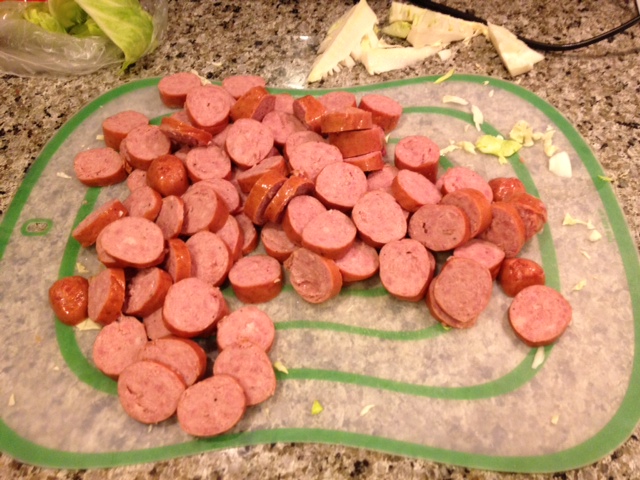
    My Dad's Cabbage & Sausage

    Dad's Cabbage & Sausage
     
    I had this practically every week growing up, and I still love it! It only takes a couple of ingredients and you have dinner done! Cooking the rice takes longer than cooking the C&S! And in my household, I still have enough left over for lunch the next day!
     
    Ingredients:
    1 head of green cabbage
    2 packages of smoked sausage (I use Hillshire Farm's Smoked Turkey Sausages)
    2 - 3 cups White rice (You can do more, it's about a cup per person, we love our rice)
    Optional: Sriracha Sauce, Tapatio, any hot sauce for taste.
     
    Directions:
     
     
    1. Heat olive oil in a large skillet over medium-high heat. Meanwhile, cut the cabbage in quarters and cut the heart/core out. Then cut cabbage leaves into bite size portions and put into a large skillet. Wilt cabbage and make sure to stir, otherwise the bottom leaves will burn. Roughly 5 minutes.
     
     
    2. Cut the sausage up into 1/4" to 1/2" slices. Add to slightly-wilted cabbage. Add salt and pepper for taste. Cover and stir every so often to make sure they don't burn. Cook for 8 to 10 minutes more.
     
     
    3. Cook rice according to instructions. Serve cabbage & sausge over white rice and enjoy!


    Thursday, March 22, 2012

    #43 DZP: Make Sushi


    #43 DZP: Make Sushi!
    {& we sure did!}

    I went to the Japanese market and bought all the necessities for making rolls!
    I only got salmon & tuna for the fish... I couldn't find real crab so we had fake crab haha!

    It's fun making sushi, a little difficult to us beginners, but fun nonetheless!

    Tuesday, March 20, 2012

    Tuesday Taste Buds: {Homemade} Twix Bars

    {Homemade} Twix Bars

    Or Thousand Dollar Bars as King Arthur calls them. Either name they still look delicious!


    {Recipe summary}
    Hands-on time: 20 mins. to 30 mins.
    Baking time: 35 mins. to 45 mins.
    Total time: 2 hrs 5 mins. to 2 hrs 25 mins.
    Yield: One 9" x 13" x 2" pan

    Shortbread layer
    ·         cup (2 sticks) salted butter, at room temperature
    ·         1 cup confectioners' sugar
    ·         2 teaspoons vanilla extract
    ·         2 cups King Arthur Unbleached All-Purpose Flour

    Caramel layer
    ·         2 cups caramel, cut into small chunks
    ·         3 tablespoons heavy cream

    Chocolate layer
    ·         3 cups chopped milk chocolate or dark chocolate, melted
    ·         1 tablespoon vegetable shortening (optional)

    DIRECTIONS:

    1)      FOR THE CRUST: Preheat your oven to 300°F. Spray a 9" x 13" pan lightly with cooking spray, or line with parchment, and set aside.

    2)     In a medium-sized bowl, beat together the butter, sugar and vanilla. Add the flour. At first the mixture may seem dry, but will come together as you continue to beat at medium speed.

    3)     Take the dough (it will be somewhat stiff) and press it evenly into the pan. Lightly flouring your fingertips will help with any sticking.

    4)     Prick the crust all over with a fork. The holes will allow steam to escape and the crust will bake evenly with fewer bubbles.

    5)     Bake the crust until it's lightly golden brown on top and the edges are deeper golden brown, about 35 to 45 minutes. Remove from the oven and immediately run a knife around the edges to loosen the crust. Set it aside to cool completely.

    6)     FOR THE CARAMEL LAYER: Melt the caramel and cream over low heat in a small saucepan. Pour the caramel over the cooled crust and set in the refrigerator for 30 minutes to chill and firm up.

    7)     FOR THE CHOCOLATE LAYER: Melt the milk or dark chocolate slowly in a double boiler or over very low heat. If it seems very thick, add a tablespoon of shortening to thin it. Pour evenly over the chilled caramel layer and spread to cover all of the caramel. Return to the fridge until the chocolate is well set. Cut into 2" x 2" squares to serve. It's best to store these bars in the refrigerator.

    8)    These bars can also be cut and dipped in milk chocolate to resemble Twix bars. After the caramel layer has chilled firm, cut down the length of the pan, splitting the bars into two long, narrow bars. Then cut each long strip into "fingers". Dip the chilled bars into melted chocolate and place on parchment paper to set for several hours.

    Tuesday, March 13, 2012

    Tuesday Taste Buds - Margarita Cupcakes


    ¡Salud!

    A while ago, I found this recipe and seeing how I just came back from Mexico (and not to mention that I also drank my fair share of margaritas there) I felt that these cupcakes were perfect to make!

    It's simple and doesn't take that long to make. Just prep, throw in the oven, drink your share of a margaritas in your favorite margarita glass, take a shot of tequila, and take out cupcakes to cool.

    For the icing: not complicated either! Whip them together, take another shot, pucker up lips for sour lime juice, and lick frosting off the spatula!

    But here's the recipe adapted from Homemade By Holman


    Cupcakes:
    1 box white cake mix

    7 1/2 ounces margarita mix
    2 ounces tequila
    1/2 ounce orange juice
    3 large egg whites
    2 tbsp vegetable oil
    Zest of 1 lime

    Preheat oven to 350 degrees and line 24 muffin tins with paper liners or spray with baking spray. Mix together margarita mix, tequila and orange juice in a large measuring cup. Add cake mix to mixing bowl and add egg whites, oil, lime zest and tequila mix. Beat on low speed for about 30 seconds until dry ingredients are incorporated and then beat on medium high speed for 2 minutes. Spoon batter evenly into muffin cups, filling about 2/3 of the way full. Bake for 20-25 minutes until a toothpick inserted in the center cupcake comes out clean. Cool about 5 minutes in the pan and then cool completely on wire racks.


    Icing:
    8 oz cream cheese, room temperature
    1/2 cup unsalted butter, room temperature
    2-3 tbsp lime juice
    4 cups powdered sugar
    1 tsp lime zest
    3-4 drops green food coloring

    Beat cream cheese and butter on medium high speed until smooth and fluffy, about 3 minutes. Add 2 tbsp lime juice and lime zest and beat until combined. Add powdered sugar 1 cup at a time, beating on low speed until incorporated. Add more lime juice if necessary. Add food coloring a couple drops at a time and beat on medium high speed until desired color is reached and icing is smooth. Pipe onto cooled cupcakes as desired.


    Lime wedges, straws, and sprinkles all make festive garnishes. Refrigerate cupcakes in an airtight container if not serving immediately and bring to room temperature a couple hours prior to serving.


    2/5 Done on #88 DZP!

    Tuesday, February 14, 2012

    Tuesday Taste Buds: Red Velvet Cupcakes with Cheesecake Filling

    Red Velvet Cupcakes
    with Cheesecake Filling
    & Cream Cheese Frosting


    Thanks to Pinterest and Sweet Little Details, I now have a wonderful new red velvet cupcake recipe! I made it for Valentine's Day and they seem to be a hit! Yeah!

    "Surprise Red Velvet Cupcakes" makes 2 dozen cupcakes (and then some)

    Filling
    I doubled the recipe like the Jen @ Sweet Little Details Blog said she does, and I had plenty extra left over, so next time I'm going to try just the one batch.
    1 8oz package cream cheese, softened
    1 egg
    1/3 cup sugar
    8-10 ounces of white chocolate chips (I think next time I'm not going to throw these in, just the cheese)

    In a small bowl, blend cream cheese, egg and sugar. Beat until smooth. Add white
    chocolate chips.

    Red Velvet Cake
    Jen also said she used a boxed Red Velvet Cake mix, so I did too! Just prepare as normal.
    If you want a recipe, click the link above... she has a recipe on her blog too.

    Fill prepared pans 2/3 full and top with heaping teaspoon of filling. Bake at 350 for 20 -25 minutes.
    If you choose to frost these cupcakes, cool completely before frosting.

    Cream Cheese Frosting
    2 8 oz packages cream cheese, softened
    1/2 cup butter, softened
    2 pounds confectioners sugar
    2 teaspoons vanilla

    Cream together cream cheese and butter. Beat in vanilla. On low speed, add confectioners sugar a little at a time. Once all sugar has been added increase to medium speed until frosting is creamy.

    1/5 Done on #88 DZP!

    Tuesday, February 7, 2012

    Tuesday Taste Buds: Red Velvet Cupcakes


    Seeing how Valentine's Day is just a week away, Red Velvet is very popular this time of year. It's a delicious chocolate red-dyed cake and creamy cheese frosting. Now if you have never had a slice of red velvet heaven, then first: shame on you, and second: do it, do it now! I think I'll make some of these bad-boys for the bf since I know he LOVES red velvet :)


    Pin It
     
    So here's a great recipe from Martha Stewart's Favorite Cupcakes:
    Ingredients
    • 2 1/2 cups cake flour (not self- rising), sifted
    • 2 tablespoons unsweetened Dutch-process cocoa powder
    • 1 teaspoon salt
    • 1 1/2 cups sugar
    • 1 1/2 cups vegetable oil
    • 2 large eggs, room temperature
    • 1/2 teaspoon red gel-paste food color
    • 1 teaspoon pure vanilla extract
    • 1 cup buttermilk
    • 1 1/2 teaspoons baking soda
    • 2 teaspoons distilled white vinegar
    Directions
    1. Preheat oven to 350 degrees. Line standard muffin tins with paper liners. Whisk together cake flour, cocoa, and salt.
    2. With an electric mixer on medium-high speed, whisk together sugar and oil until combined. Add eggs, one at a time, beating until each is incorporated, scraping down sides of bowl as needed. Mix in food color and vanilla.
    3. Reduce speed to low. Add flour mixture in three batches, alternating with two additions of buttermilk, and whisking well after each. Stir together the baking soda and vinegar in a small bowl (it will foam); add mixture to the batter, and mix on medium speed 10 seconds.
    4. Divide batter evenly among lined cups, filling each three-quarters full. Bake, rotating tins halfway through, until a cake tester inserted in centers comes out clean, about 20 minutes. Transfer tins to wire racks to cool completely before removing cupcakes. Cupcakes can be stored overnight at room temperature, or frozen up to 2 months, in airtight containers.
    5. To finish, use a small offset spatula to spread cupcakes with frosting.

    Martha’s Note: Gel-paste food color is much more concentrated than the supermarket liquid variety; if you substitute the liquid, you may need to add an entire bottle (1.5 ounces) to achieve the desired shade.

    Cream Cheese Frosting:
    Ingredients


  • 8 ounces (2 sticks) unsalted butter, room temperature
  • 12 ounces cream cheese, room temperature
  • 1 pound (4 cups) confectioners' sugar, sifted
  • 3/4 teaspoon pure vanilla extract

  • Directions
    1. Beat butter and cream cheese with a mixer on medium-high speed until fluffy, 2 to 3 minutes. Reduce speed to low. Add sugar, 1 cup at a time, and then vanilla; mix until smooth.

    Tuesday, January 24, 2012

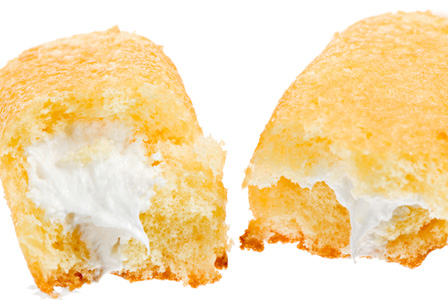
    Taste Bud Tuesday: Homemade {Twinkies}

    Homemade Twinkies!

    *Say Whaaa!*
    Saw this recipe from my newly acquired pinterest account, and I would love to make these. I'm not the biggest fan of twinkies, but read the recipe, and you'll see with the ingredients it sounds deee-lish!! Besides, it's {homemade!!}

    Ingredients: 

    For the cake: 
    • 1/2 cup sugar
    • 1/2 cup brown sugar
    • 2 eggs
    • 1-1/4 cups all-purpose flour
    • 1/2 cup milk 
    • 1/3 cup canola oil
    • 1 teaspoon baking powder
    • 1 teaspoon vanilla
    For the filling: 
    • 1/3 cup shortening
    • 1/4 cup sugar
    • 1/2 teaspoon vanilla extract
    • 1/4 cup light cream
    • 1/2 cup confectioners' sugar

    Directions: 

    1. Preheat the oven to 350 degrees F. Grease three mini loaf pans with cooking spray. 
    2. Beat the eggs and sugar with a handheld mixer until thick. Slowly add in all other ingredients and beat until fully combined. Divide the batter among the mini loaf pans, filling about 3/4 full. Bake cakes for at least an hour, or until golden brown. Cool in pans and then transfer to a wire cooling rack.
    3. While cakes cook, prepare filling by mixing shortening, sugar, vanilla and light cream with a hand mixer. Once mixed, slowly add in sugar and beat until combined. Fill a pastry bag with frosting and cut a small hole. 
    4. Once cakes have cooled, carefully poke three holes in the bottom of the cakes. Pipe frosting into the holes until just filled. Cool for at least 20 minutes and enjoy!
    Also hop on over to the website I saw this from and they have other Hostess related recipes that are easy {DIY yummies!}

    Tuesday, January 17, 2012

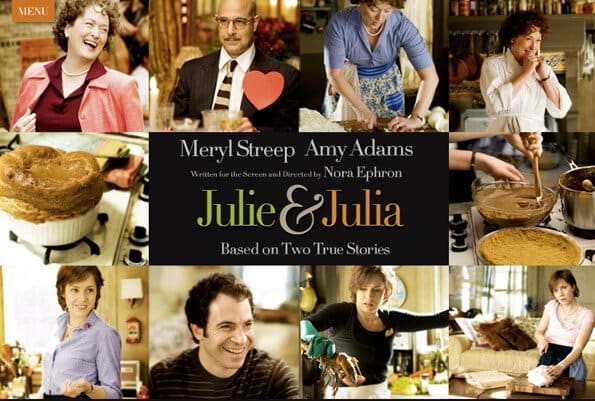
    #98 DZP: Julie & Julia


    In 2002, Julie Powell is a young writer with an unpleasant job at the Lower Manhattan Development Corporation's call center, where she answers telephone calls from victims of the September 11 attacks and members of the general public complaining about the LMDC's controversial plans for rebuilding the World Trade Center. To do something she enjoys, she decides to cook every recipe in Mastering the Art of French Cooking (1961) by Julia Child in one year; Powell decides to write a blog to motivate herself and document her progress.

    Woven into the story of Powell's time in Queens in the early 2000s is the story of Child's time in Paris throughout the 1950s, where she attends Le Cordon Bleu to learn French cooking and begins collaborating on a book about French cooking for American housewives. The plot highlights similarities in the women's challenges. Both women receive much support from their husbands, except when Powell's husband becomes fed up with her excessive devotion to her hobby and leaves her for a short time.

    Eventually, Powell's blog is featured in a story published in The New York Times, after which her project begins to receive the attention of journalists, literary agents, publishers, and a dismissive response from Child herself. Although Child's book is rejected by Houghton Mifflin, it is accepted and published by Alfred A. Knopf. The last scene shows Powell and her husband visiting Child's kitchen at the Smithsonian Institution and Child in the same kitchen receiving a first print of her cookbook and celebrating the event with her husband.

    I have to say this was such an adorable movie, and it was a shame I didn't see this back in 2009!
    I watched this with my Mother, and it was a great movie to watch with my personal baking inspiration (thanks mommy!). Now after watching this movie, I want to tackle a chef/cook/baker of today and cook/bake my way through their cook book! Maybe Alton Brown's Good Eats (part 1, 2, OR 3). Or Giada De Laurentiis' Giada at Home: Family Recipes from Italy and California and learn all her Italian cooking. Or Anne Burrell's Cook Like a Rock Star. Or Nadia G's Bitchin' Kitchen: Cookin' for Trouble! All great books and I would love to cook a recipe a day from those Kitchen Masters. Alex and I watch plenty of Food Network and Cooking Channel, and yes indeed we "stay hungry". But now being inspired by Julie Powell's love for cooking and love for Julia Child, I want to embrace a cookbook and learn something new and maybe one day teach it to Ryan!

    Tuesday, December 13, 2011

    Tuesday Taste Buds: Apple Cider Snickerdoodle Cookies

    So last weekend Erin over at the L&C hosted a lovely Christmas cookie exchange party, second annual btw. There were several types of cookies but this recipe caught my taste buds by surprise. I always enjoy a good snickerdoodle cookie, but *be still my heart* an APPLE CIDER one! Oh that I had to try one.... or five. The kick ass Miss Taryn at Pink.Dazzle.Gloss introduced me to a wonderful new holiday cookie and was so kind to give me the recipe (to share with you too of course!)


    Ingredients:

    1 1/4 cups apple cider
    1 1/2 cups all-purpose flour
    1 teaspoon cream of tartar
    1/2 teaspoon baking soda
    1/2 teaspoon ground cinnamon
    1/2 teaspoon kosher salt
    1/2 cup unsalted butter, at room temperature
    1/2 cup granulated sugar, plus 3 tablespoons for rolling
    1/4 cup packed light brown sugar
    1 large egg
    1/4 cup plus 2 tablespoons finely chopped red and green crispy apple chips, plus whole chips for garnish
    2 teaspoons apple pie spice (or a little extra cinnamon if you can't find the spice)


    Directions:

    - Preheat the oven to 400 degrees F.

    - Heat the cider in a medium skillet over medium-high heat until it comes to a boil. Continue to cook until syrupy and reduced to about 2 tablespoons, 12 to 14 minutes. Set aside to cool slightly.

    - Whisk the flour, cream of tartar, baking soda, cinnamon and salt in a medium bowl until smooth. Beat the butter with 1/2 cup of the granulated sugar and the light brown sugar in a separate bowl on medium-high speed until fluffy and smooth, 2 to 3 minutes. Beat in the reduced cider and the egg (the mixture may look slightly curdled). Stir in the flour mixture and 1/4 cup of the chopped apple chips until combined.

    - Stir together the remaining 3 tablespoons of granulated sugar, 2 tablespoons of chopped apple chips and the apple pie spice in a small bowl. Roll heaping tablespoons of dough into balls, using lightly moistened hands if the dough is too sticky, and then roll in the spiced sugar mixture. Place the dough balls 3 inches apart on ungreased baking sheets and top with a few pieces of whole apple chips. Bake until the edges are just set but centers are still soft, 11 to 13 minutes, rotating pans halfway through the baking time. Cool 2 to 3 minutes on the baking sheet, and then transfer to a wire rack to cool completely.


    Monday, May 23, 2011

    Three Hearts Bake Esty Shop


    Looking for a tasty treat!? Look no further because Mel's cookies fill your sweet tooth up!
    She has chocolate chip ganache cookie sandwiches (regular and mini), chocolate chocolate nutella cookie sandwiches, butter tarts, and oatmeal peanut butter cookie sandwiches.

    My favorite is the chocolate chip ganache ones! YUM!
    "The perfect cookie experience. Rich chocolate ganache sandwiched between two freshly baked chocolate chip cookies."


    Your purchase will contain a bakers dozen (13 total sandwich cookies). Each cookie is approximately 2.5" in diameter, comes individually wrapped in a cello bag and sealed. Hand-written note available upon request. You can also request for mixed dozens so you can have a little of each type of cookie!


    Check it out! Do it! Do it now!!

    Tuesday, March 22, 2011

    #75 DZP: Bake cupcakes like the cupcakes in Hello Cupcake!

    That's right! Here's the story...

    Lil Alex gave up pasta for Lent. Spaghetti practically her favorite thing to eat!!

    So when she asked me to bake cupcakes for her birthday BBQ, (like everything else I baked for her in the past) I had to get creative and wanted to bake crazy cupcakes for her!

    I went looking through my recipe books and came across my beloved Hello Cupcake book... and then I thought of #75 on my DZP... then *ding* it hit me...


    Above is a picture from the book itself and the inspiration to make her spaghetti cupcakes!

    And this picture below are my cupcakes...


    So before you think I took out beef for meatballs, marinara sauce, and Parmesan for the cheese, let me explain...
    Spaghetti is vanilla frosting tinted with yellow food coloring and a tad bit of chocolate powder: the fun part was icing the cakes with a small 1/8th" tip.
    Meatballs are hazelnut chocolates
    Spaghetti sauce is strawberry jam
    Cheese topping is white chocolate

    The recipe is for 10 cupcakes, but I made 18... and it calls for vanilla cake, but I made chocolate (Lil Alex's request of course). Nevertheless, it was super easy to bake and fun to create!